When I first presented the SKYLINE design in 2020, I kept hearing the words, “I could never do something as difficult as that”. So, I’m here to tell you, not only is it an easy technique, but even a beginner who has mastered a few basic stitches (single crochet, double crochet, slip stitch) can do this. Okay – so maybe you don’t want to start with the SKYLINE pattern, but you can certainly master a basic repeat pattern before you move on to something a bit more complex. At the risk of putting you off with cliches, “Practice really does make perfect”.
If you are still thinking, “I can’t”, then it’s my hope to banish those doubts with a some basic constructs.
- 1.) Mosaic Overlay technique uses only 4 basic stitches: CH (chain), SC (single crochet), DC (double crochet) and SL ST (slip stitch). If you’ve purchased one of my patterns, then you might have noticed that, instead of SC, the pattern reads “BL SC”. That only means to place your single crochet into the back loop (BL). If you aren’t sure what that means, then I encourage you to visit the WoollyFae YouTube channel for a mosaic overlay tutorial. Sometimes it helps to utilize visual aids. You will also notice that (in my patterns) double crochet stitches are marked DdDC. This translates as “Dip-down double crochet”, which is a double crochet that is placed in the front loop of the corresponding color two rows down. But, I’m getting ahead of myself, so we will return to the DdDC further down in the post.
- Mosaic overlay is worked “right-side only”, which means you never turn the work. Instead, you fasten off at the end of each row by chaining 2 (CH 2) snipping the yarn, pulling the hook straight up until it is free and then sliding your fingers down the tail to form a knot. Once you have done this, you return to the first stitch – same side – attach your new yarn (this always counts as the first stitch), and continue to follow the graph or written instructions for the new row.
- When reading a mosaic overlay graph, you will work bottom-to-top and right-to-left. Row numbers and Yarn colors are indicated in margins. Row 1 will always be the “foundation row” (do not confuse the foundation row with the foundation chain). If you prefer to build your foundation row without chaining, then, of course, you would forego the chain and begin at Row 1. Each cell on the graph represents a stitch. You will always attach your yarn to stitch represented by the first cell (right side of graph) and continue with the written instructions from there. In reality, the written instructions are not a necessity when working mosaic overlay, but they are generally included as an essential reference.
- Cells indicating a Dip-down Double Crochet stitches (DdDC) are marked with an X. Empty boxes indicate a BL SC (back-loop single crochet stitch). It is imperative that you ALWAYS work into the back loop, because DdDC is worked into the front loop. So to break it down further: The color-ways that create the overall design are achieved by working double crochet stitches over the top of single crochet stitches from the previous row (on cells marked with an X on the graph). In order to do this, you need to work that double crochet stitch into the front loop two rows down. So, let’s take a look at a small block from an actual graph.
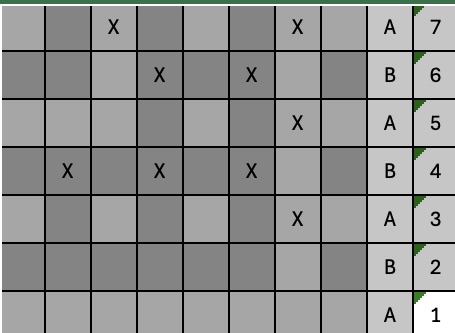
Row 1 is the foundation row. The foundation row is composed of single crochet stitches that are worked into the foundation chain. The foundation chain is not reflected on the graph; rather, the text box above the graph (and in the written instructions) will indicate the chain count and the FSC (final stitch count) after Row 1 is completed. In mosaic overlay, the only change to total stitch counts is the transition from the chain to the foundation row and will always be a difference of one stitch.
Row 2: You would attach Color B to the first stitch and, as you can see, there are no cells marked with an X. Therefore, you would continue to single crochet into the back loop only.
Row 3: You would attach color A to the first stitch. The second cell is marked with an X. Therefore, you would DOUBLE CROCHET into the front loop of the corresponding color A stitch on row 1 (two rows down). The remaining cells are not marked with an X, so you would single crochet into the back loop of each remaining stitch.
Row 4: You would attach color B to the first ST and single crochet into the back loop of the next stitch. The 3rd cell (also the third stitch) is marked with an X. You would, therefore, double crochet into the front loops of the corresponding stitch two rows down (row 2). On the fourth cell of the graph, there is no X, so you would BL SC, fifth cell of the graph is marked, so you would DdDC . . .
Let’s use Row 5, 6 as an example of how this would be presented in the written instructions.
Row 5: Attach yarn first ST. DdDC next ST. SC x6 . . .
Row 6: Attach yarn first ST. [BL SC next ST. DdDC next ST]x2. BL SC x3 . . .
Notice in Row 6, how two of the stitches on the graph are contained within brackets. Immediate after, you see x2. This translates as working the bracketed stitches TWICE. On occasion, you will see brackets within brackets. Sometimes they are presented as parenthesis within brackets instead. Example – not shown on graph: [BL SC x5. (DdDC next ST. BL SC next ST. DdDC next ST.) x3] x2. In this case, you would repeat the stitches within the bracket two times and you would repeat the stitches within the parenthesis three times, with each repeat of the bracket stitches. Remember that if you have questions regarding your mosaic overlay written instructions, you should always reference the graph. If you still have questions, contact the designer. Most designers are happy to help.
- One final note on the mosaic overlay technique: When you attach yarn to the first ST and fasten off after the final ST, you will have fringe on both sides. There are several methods of dealing with the fringe. 1.) Keep it short like the fringe on a retail blanket. 2.) Put a double-sided border around your work to conceal the fringe. 3.) Some WoollyFae Designs are constructed along the vertical lines of the blanket, rather than constructing from the bottom to the top. This allows the fringe to fall top and bottom of the blanket, rather than at the sides. If you are not particular about where the fringe is located, then no worries. If you are, you will want a pattern that takes this into consideration. Again, you can always utilize a double-sided border to conceal the fringe.
Those of you who are looking to try your hand at Mosaic Overlay Technique will hopefully have a little better grasp of the process, as well as an understanding the overall pattern. Please feel free to contact me at the email provided if you have any questions regarding the Mosaic Overlay technique and I will be more than happy to assist you in any way I can.
HAPPY CRAFTING!
